Description
The Boundaries panel provides tools for automatically and manually classifying quilt boundary edges for the flood fill algorithm (which automatically generates groups of quilts to be assembled). Boundaries can either be classified as Blocking (i.e. an edge that should be preserved in the final quilt topology) or Open (i.e. an edge that should be removed). The flood fill algorithm floods past boundaries marked as Open and stops at boundaries marked as Blocking. Quilt groups are updated automatically as boundary classifications are toggled (as seen both in the Display window and in the Quilt Groups table on the Groups tab.
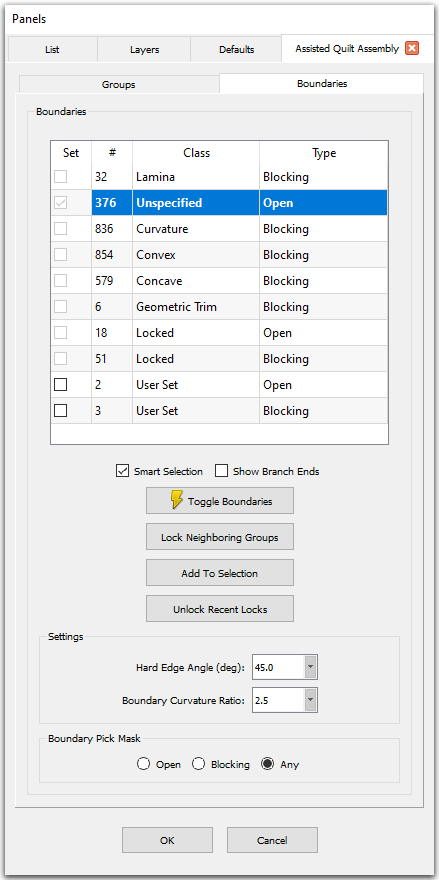
The Boundaries table shows information about how quilt boundaries are currently classified. The table is read-only and consists of four columns. The Class column shows the name of the filter and the Type column indicates its type for the flood fill algorithm: either Blocking or Open. The # column shows the number of boundary edges currently belonging to each filter. Refer to the Boundary Classification Filters section below for a description of each classification filter.
Note: Just as with tables in other tasks, highlighting a filter in the Boundaries table also highlights the boundaries in that filter in the Display window. This can be helpful if you need to locate Lamina edges or check if the parameters in the Settings frame for automatically classifying Curvature, Convex, and Concave boundaries need to be adjusted.
The Set column can be used to manually add the selected quilt boundaries to either of the user specified filters (User Set - Open or User Set - Blocking) but is disabled for the automatic filters. Check the box to assign the selected boundary to one of the User Set filters. To remove a boundary from a User Set filter, simply select the boundary and uncheck the box. The boundary will automatically return to the appropriate automatic filter, according to the current settings in the Settings frame.
Note: In most cases, boundaries will need to be moved into the User Set filter of the opposite type. However, sometimes you may want to preserve a boundary's current type while you change the Settings to automatically target other boundaries. In this situation, use the checkbox in the Set column of the appropriate User Set filter to prevent the boundary from being reclassified automatically.
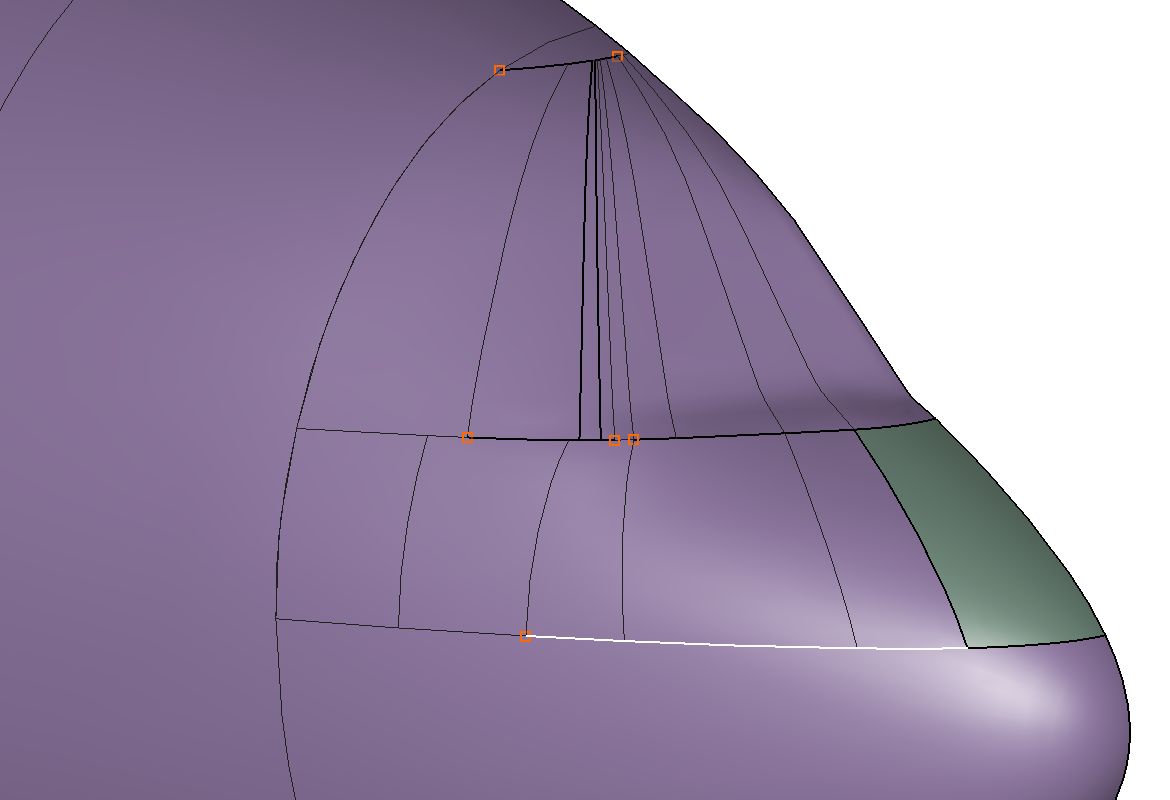
Below the table are a group of checkboxes and buttons that aid in selecting and reassigning quilt boundaries as well as locking quilt groups. When Smart Selection is enabled, selecting a boundary in the Display window will also select additional adjacent boundaries of the same type. If the selected boundary is Open additional Open boundaries will be selected in as straight a line a possible in both directions until a Blocking boundary is encountered. Similarly, if the selected boundary is Blocking additional Blocking boundaries will be selected in both directions until a fork is encountered. When enabled, Show Branch Ends renders branch ends using an orange square so that you can quickly find and toggle the offending boundaries. By default, Smart Selection is checked and Show Branch Ends is unchecked.
Use Toggle Boundaries to quickly move the selected boundaries into the User Set filter of the opposite type. Using Toggle Boundaries on a boundary already in one of the User Set filters moves it back into the appropriate automatic filter. Use Lock Neighboring Groups to lock any quilt groups associated with the selected boundaries. Locking a quilt group automatically moves the boundaries into the Locked filter of the same type so that they cannot be reclassified by subsequent changes to the Settings. Both actions have associated shortcuts: Ctrl+F for Toggle Boundaries and Ctrl+G for Lock Neighboring Groups.
Tip: There are actually two shortcuts available on each tab of Assisted
Quilt Assembly. On the Boundaries tab, the lightning bolt
(![]() )
indicates that the Ctrl+F shortcut can be
used to perform the Toggle Boundaries action. However, Lock Neighboring Groups
has a shortcut too: Ctrl+G!
)
indicates that the Ctrl+F shortcut can be
used to perform the Toggle Boundaries action. However, Lock Neighboring Groups
has a shortcut too: Ctrl+G!
Use Add To Selection to add all of the boundaries in highlighted filter to the current selection. Use Unlock Recent Locks to quickly undo the most recent locking action.
Settings and Boundary Pick Mask
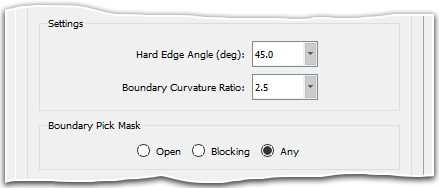
The Settings frame provides controls for automatically assigning quilt boundaries to the Curvature, Convex, and Concave filters. Hard Edge Angle is the angle (prescribed in degrees) used to determine whether a boundary between two quilts represents a convex or concave edge. This parameter has a default value of 45.0 degrees and a valid range of [0, 180), where a value of 0 disables the parameter. If the angle between the quilt normals is greater than the prescribed value, the edge is classified as Convex (if the normals point away from the boundary) or Concave (if the normals point towards the boundary).
Boundary Curvature Ratio is the ratio between the surface curvature and the curvature along the boundary. This parameter has a default value of 2.5 and a valid range of [0, ∞), where a value of 0 disables the parameter. Boundaries that have a ratio greater than the prescribed value are classified as Curvature.
Boundary Pick Mask controls which boundaries are available for selection and has three options: Open, Blocking, and Any. Depending on the problem at hand, it may be preferable to use box selection to quickly select and toggle a large number of boundaries of the same type. For instance, in the image above showing the branch ends, you could set the Boundary Pick Mask to Blocking and use box selection to select and toggle all Blocking boundaries in this region to Open.Boundary Classification Filters
There are ten filters a quilt boundary can be assigned to, eight automatically assigned filters and two user specified filters:
- Lamina: This filter contains all lamina boundary edges (i.e. free edges) that are present in the model and has a Type of Blocking. Lamina edges cannot be moved to another filter and so this filter serves as purely informational.
Tip: The Lamina boundary filter can be useful in identifying potential problems in your geometry. If you expect to have lamina edges in your model (for instance, if your model has been cut in half with a symmetry plane), then no further action is required and you may continue with your quilt assembly. However, if the Lamina filter contains more edges than you expected, you can select the filter in the table to highlight the boundaries in the Display window. Once you have located the regions of interest, exit Assisted Quilt Assembly and use Assemble Models or other best practices to close the gaps!
- Curvature: Boundaries are classified as Curvature if the ratio between the surface curvature and the curvature along the boundary is greater than the Boundary Curvature Ratio specified in the Settings frame. The Curvature filter has a Type of Blocking.
- Convex/Concave: Boundaries are classified as Convex and Concave according to both the Hard Edge Angle specified in the Settings frame and the orientation of the geometry. If the angle between the adjacent quilt normals is greater than the prescribed value, the boundary is classified as Convex (if the normals point away from the boundary) or Concave (if the normals point towards the boundary). Both the Convex and Concave filters have a Type of Blocking.
- Geometric Trim: Boundaries that were created using the any of the trimming commands available in Fidelity Pointwise (Trim by Surfaces, Trim by Curves, Trim Geometrically) are automatically classified as Geometric Trim, which has a Type of Blocking.
- Unspecified: Boundaries not classified as Lamina, Curvature, Convex, Concave, or Geometric Trim are automatically assigned to the Unspecified filter, which has a Type of Open.
- Locked: Locking a quilt group (either from the Groups tab or using the Lock Neighboring Groups button described above) automatically moves the boundaries associated with that group into the Locked filters. Boundaries that were previously assigned to an Open type filter are moved into the Locked - Open filter and boundaries previously assigned to a Blocking type filter are moved into the Locked - Blocking filter. Boundaries in the Locked filters are not available for selection via the Display window nor can they be reclassified by subsequent changes to the parameters in the Settings frame. Unlocking a quilt group automatically reassigns the boundaries in that quilt group to the appropriate unlocked filter.
- User Set: Any boundary that is not assigned to the Lamina filter or part of a locked quilt group can be placed in one of the User Set filters either to prevent it from being automatically reassigned by subsequent changes to the Settings or to change its Type. This can be done in one of two ways. Pressing the Toggle Boundaries button (or using the Ctrl+F shortcut) moves the currently selected boundaries into the User Set filter of the opposite type. Alternatively, you can use the checkboxes in the Set column to move the selected boundaries into the desired User Set filter.