Description
New segments are usually inserted into an existing curve when there is a need to have a different segment type internal to the curve. This being the case, segments can only be inserted at the beginning of an existing segment.
For example, take a case in which the existing curve is composed of two line segments. To make this curve look like the profile of a bump in a channel, a Circle curve segment is needed in the middle of the curve.
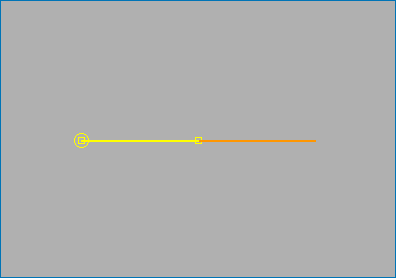
Use the Current Segment left and right arrow buttons to select the segment in front of which you need to insert the new segment. Then click Insert in the Segments frame. At this point, the type of segment to be inserted can be chosen from the Segment Type frame. For our example, a Circle curve segment will be inserted between the first and second line curve segments.
Once the segment type is selected, control points for the new segment need to be placed. With that in mind, it is important to understand a few basic rules that pertain to how control points are inserted for a new segment:
- Control points are always inserted at the beginning of the selected segment.
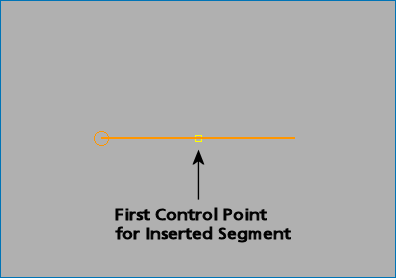
- When inserting a new segment between two existing segments, the first control point for the inserted segment (which corresponds to the end of the first segment), will already be selected.
- When inserting a new segment at the beginning of an existing segment (where no other segment connects), it is your responsibility to place the first control point.
The last two rules mostly matter when inserting a segment type such as a Circle or Conic where a set number of control points are expected.
So, if these rules are taken and applied to our example, the first control point for the inserted Circle segment is the existing control point highlighted in yellow. This first control point can be moved by holding the Ctrl key, left-clicking on the point, and either specifying a new XYZ location in the Point Placement frame or by dragging the point to its new location.
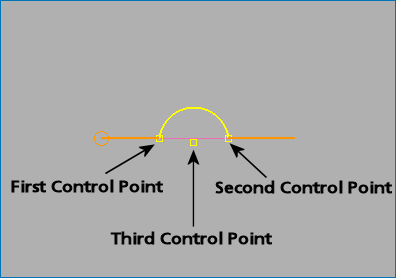
Since this point will serve as the connection between the first segment and the Circle segment, the next two control points for the circle will need to be specified to the right of it.
Clicking OK in the Edit Curve panel after control point placement will update the two segments in between which the new segment was inserted and save the entire curve.