Description
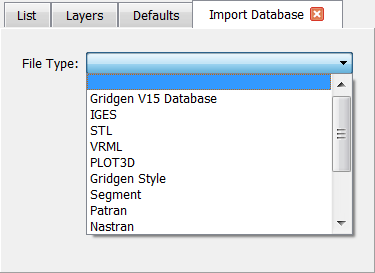
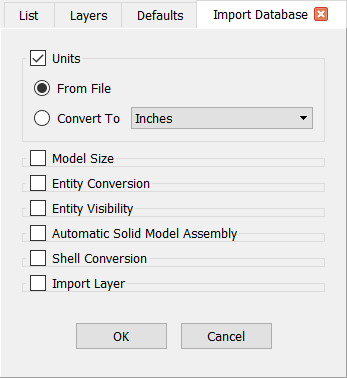
The Import Database command reads database data from non-native files into Fidelity Pointwise. After selecting File, Import, Database, the presented file browser will allow you to choose the file type from a list of supported formats, the directory in which the file resides, and the name of the file to open. After selecting an IGES database, native CAD file, or unstructured wireframe file (STL for example) for import, the Import Database panel (shown below) opens for selection of various import options.
Units
On first use, only the Units frame at the top of the panel will be expanded. The options in this frame can be used to specify whether the CAD data should be scaled on import or not.
- From File: If the From File option is selected, the CAD data will be imported without scaling (i.e. in the units specified in the CAD file).
- Convert To: On the other hand, if the Convert To option is selected, the CAD data will be converted (scaled) on import from the units specified in the CAD file to the units selected from the pull-down list. If no units are specified in the CAD file, the data will be imported as-is (without scaling) independently of the selected option.
Model Size
In the Model Size frame there are controls for determining the Model Size tolerance (File, Properties) at database import.
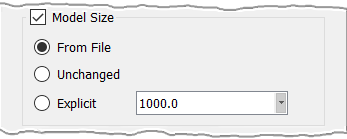
- From File: The default option, From File, will assess the overall dimensions of the incoming file and set the tolerance automatically.
- Unchanged: Unchanged will not make any changes to the current Model Size tolerance and is useful when adding new geometry to existing database entities already in the project or session.
- Explicit: The last option, Explicit, provides a text field to enter a user defined Model Size tolerance directly.
Entity Conversion
The Entity Conversion frame provides tools for applying various modifications to the import of the geometry.
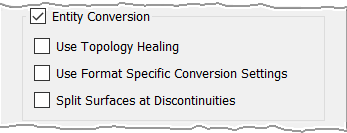
- Use Topology Healing: Check on Use Topology Healing to have native CAD files imported with analysis and improvement of trimming curve accuracy. There will be no changes to the shape definition of surfaces. This option is off by default.
- Use Format Specific Conversion Settings: Use Format Specific Conversion Settings is off by default and changes the conversion process to use format unique settings. This may provide different import results.
- Split Surfaces at Discontinuities: When Split Surfaces at Discontinuities is checked on, bilinear surfaces are automatically split on import. In some cases this can result in a single surface of an IGES or CAD file being imported as several entities. The default is to not split.
Entity Visibility
Use settings in the Entity Visibility frame to control initial visibility of entities after import.
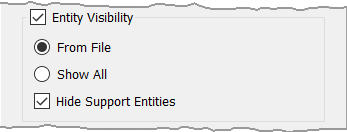
- From File: From File is toggled on by default so that the visibility settings saved in the CAD file are used.
- Show All: You can select Show All to override any visibility settings in the file and have all entities shown.
- Hide Support Entities: Hide Support Entities is also checked on by default to have any parent information automatically hidden, for instance, the parent b-rep surface of a quilt.
Automatic Solid Model Assembly
In the Automatic Solid Model Assembly frame, you can set parameters to assemble models, quilts, and quilts boundaries on import.
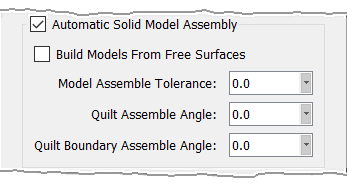
- Build Models From Free Surfaces: Check on Build Models From Free Surfaces to automatically promote each free surface into a quilt and to assemble each quilt into a model. By definition, a free surface is a surface that is not associated with any trimmed surfaces in the file. It can be a B-spline surface, a surface of revolution, a ruled surface, and so on. Note that free surface planes are not included, since they do not have natural boundaries.
- Model Assemble Tolerance: You can set a Model Assemble Tolerance, or gap tolerance, to have models automatically assembled on
import from the available surfaces. The default value for this parameter is zero (i.e. feature disabled) and it has a valid range from 0.0 to a variable upper
limit which is computed as:
Refer to the Create, Assemble, Models section for more information about solid models.Model Size / 105 - Quilt Assemble Angle: A turning angle can be entered for the Quilt Assemble Angle so that quilts are assembled based on geometric features. Quilts will be combined where the turning angle at their common edges is smaller than the value entered in this field. A value of zero (default) disables the feature. See Create, Assemble, Quilts for more information about quilts.
- Quilt Boundary Assemble Angle: A turning angle can be entered for the Quilt Boundary Assemble Angle so that quilt bounding curves are joined based on geometric features. Such curves will be joined where the turning angle at their common end points is smaller than the value entered in this field. A value of zero (default) disables the feature.
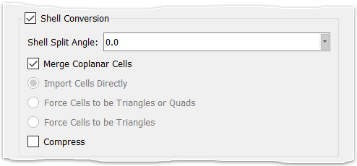
Shell Conversion
When importing unstructured wireframe data, the Shell Conversion frame provides settings to control how cells in these surfaces are treated.
Note: When importing only unstructured wireframe data, for instance from an STL file, only the Shell Conversion and Import Layers frames appear in the Import Database panel.
Use the Shell Split Angle to automatically split incoming shells by a turning angle (specified in degrees) between cells. Boundaries between cells where there is a turning angle greater than the Shell Split Angle are marked as a split location for the shell. Note that the Shell Split Angle option is not available for shell entities imported from native CAD or IGES files.
Merge Coplanar Cells overrides the three cell treatments below and is enabled by default. This option simply joins together all coplanar cells, as is possible, to reduce the overall number of cells in the shell. When Merge Coplanar Cells is off, you have three options to further control shell import:
- Import Cells Directly: Imports unstructured cells as they are in the file.
- Force Cells to be Triangles or Quads: Forces the cells to be triangles or quadrilaterals. This means cells with higher numbers of edges than quads will be split into these two element types.
- Force Cells to be Triangles: Forces all cells to be decomposed to triangles.
Use the Compress checkbox to specify whether or not you want shells to be compressed after import. Shell compression significantly reduces the memory footprint while running Fidelity Pointwise and also reduces the file size and loading time of saved project files. Compress is unchecked by default.
Note: Some operations (such as Split, Join, Extract, and Orient) require compressed shells to be temporarily expanded, which will consume additional memory. If you need to perform these types of operations on your shell entities, it is recommended to import the shells as expanded (i.e. with Compress unchecked), make your modifications, and then manually compress the shells using the Compress Shells command.
Import Layer
Most CAD formats supported can provide layering information for the database entities included. The Import Layer frame provides control over how that layer information is used at import.
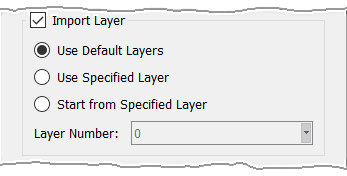
- Use Default Layers: Is the option selected by default. It simply leaves layering as it is specified in the incoming CAD file.
- Use Specified Layer: Select Use Specified Layer in order to have all incoming entities added to the same layer, using the layer number entered into the Layer Number text field.
- Start from Specified Layer: This last option keeps entities sorted in separate layers as defined in the incoming CAD file, and entities will be assigned to sequential layers starting with the layer number entered into the Layer Number text field.
Some additional options (shown below) can be presented in the Import Database panel depending on the format of the file selected for database import (e.g. UGRID format).
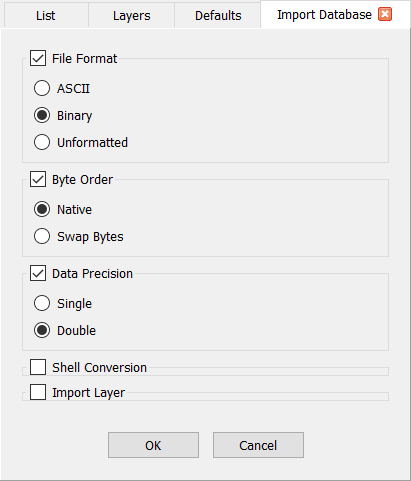
File Format
Fidelity Pointwise will attempt to automatically determine the format of the file being imported. Furthermore, the computed format will correspond to the option selected by default in this frame. Users can override Fidelity Pointwise's recommendation prior to import.
- ASCII: The ASCII reader is used to read in the file being imported.
- Binary: The Binary reader is used to read in the file being imported.
- Unformatted: The Unformatted reader is used to read in the file being imported.
Byte Order
Fidelity Pointwise will attempt to automatically determine the endianness of the file being imported. Furthermore, the computed endianness will correspond to the option selected by default in this frame. Users can override Fidelity Pointwise's recommendation prior to import.
- Native: The file is read in assuming its endianness and the endianness of the host machine to be the same.
- Swap Bytes: The file is read in assuming its endianness to be opposite to the endianness of the host machine. Byte swapping is therefore performed on import.
Data Precision
Fidelity Pointwise will attempt to automatically determine the precision of the file being imported. Furthermore, the computed precision will correspond to the option selected by default in this frame. Users can override Fidelity Pointwise's recommendation prior to import.
- Single: The file is read in assuming that it was written using single precision.
- Double: The file is read in assuming that it was written using double precision.
Note that Fidelity Pointwise will try to open the chosen file based on the attributes associated with the file type selected in the file browser. However, if the format of the file does not match the expected attributes of the specified file type or extension, Fidelity Pointwise will open the Import Database panel for File Type re-selection (see image below). Choose the appropriate file type from the pull-down list or select Cancel to exit the import operation. Depending on the chosen file type, the panel may expand with additional import options.